We’d love to hear from you — whether you have a project in mind, or just want to say hi.
info@upeoconsulting.com


Recently I needed to implement Google reCAPTCHA on a Lightning Web Component. The information available online on this topic was surprisingly scarce and scattered. After what was a bit of an ordeal I finally managed to get it working the way I wanted it to. To give back to the Ohana and save others the hassle, I decided to do a write-up so that this is available for others struggling with the same.
As always, I am merely standing on the shoulders of giants, and it’s thanks to them that I got where I needed to be. Github user WoolWarrior’s repo was especially helpful and formed the foundation of the end result. If you’re looking to implement reCAPTCA in Experience Cloud, I recommend looking at Craig Johnson’s article about it here. And last but not least, there are the countless heroes on Stack Exchange, that community is the gift that keeps on giving. That being said, let’s get into it.
The solution I ended up with comprises of:
The first step is registering a site with reCAPTCHA on https://www.google.com/recaptcha/. In this example, we’re working with v3.
Give the site a name, select reCAPTCHA v3 as the type and add your domain (minus https://www)

Submit, and you’ll get a screen with a site key and a secret key. Keep these around, you’ll need them later.

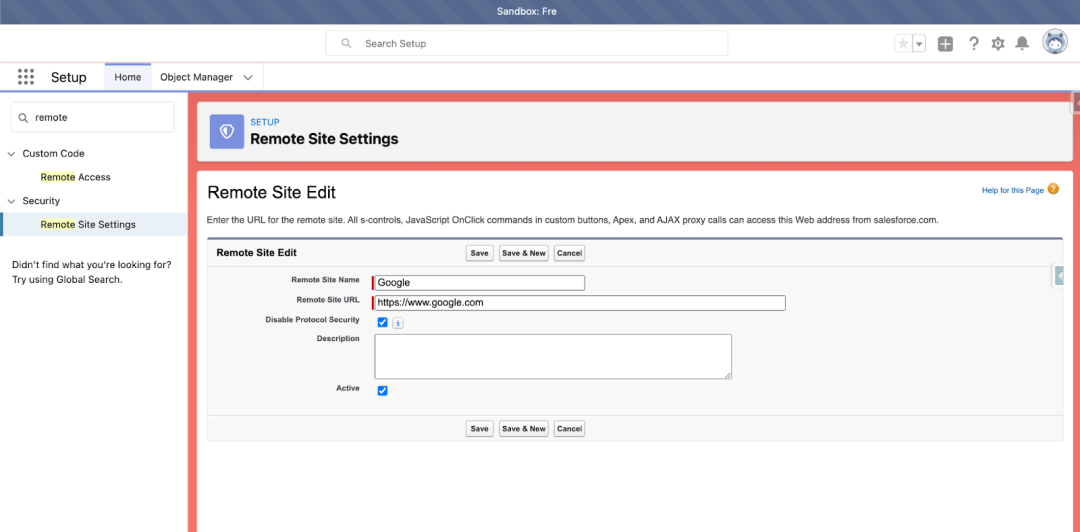
Now, head on over to your Salesforce org and go to setup. Enter ‘remote site’ in the search box and create a new remote site setting. If you don’t do this, the callouts later on will fail.
That’s it as far as the point-and-click stuff is concerned. What we’ll need next are our static resource, the apex class and the components.
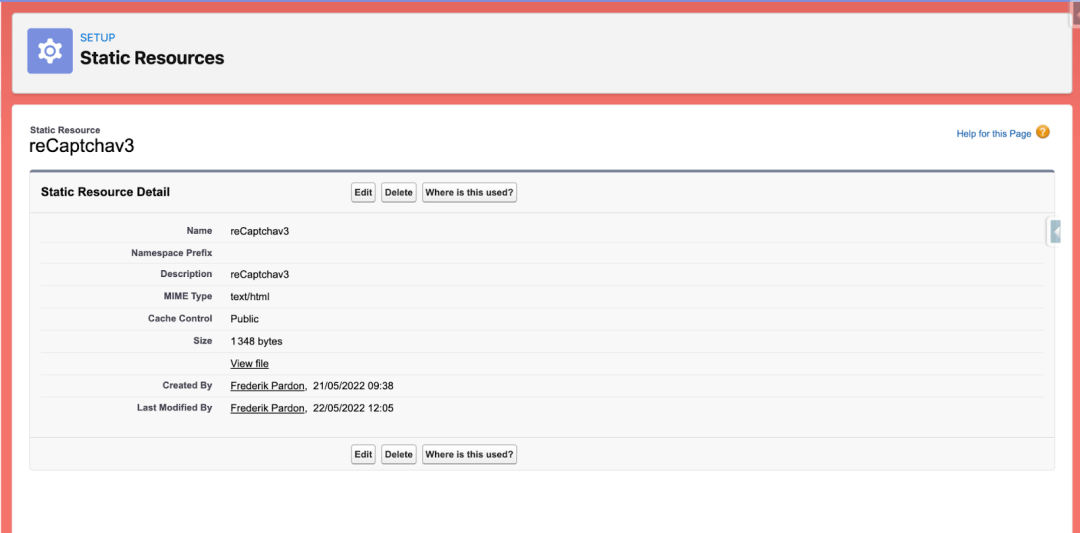
We’ll use the following HTML in our static resource. So copy the code and save it as a new html page. Then create a new static resource with the following parameters:
<head>
   <title>reCAPTCHA demo: Simple page</title>
   <script src="https://www.google.com/recaptcha/api.js?render=YOURSITEKEY"></script>
</head>
<body>
<input type="hidden" name="recaptcha_response" id="recaptchaResponse"/>
<script type="text/javascript">


   grecaptcha.ready(function() {
       grecaptcha.execute('YOURSITEKEY', {action: 'submit'}).then(function(token) {
           recaptchaResponse.value = token;
           if (token == "") {
               //replace YOURDOMAIN with your SFDC Domain (Eg: https://testorg.lightning.force.com
               parent.postMessage({ action: "getCAPCHA", callCAPTCHAResponse : "NOK"}, "https://web.archive.org/web/20220524065227/https://dev--fre.lightning.force.com");
           } else {
               parent.postMessage({ action: "getCAPCHA", callCAPTCHAResponse : token}, "https://web.archive.org/web/20220524065227/https://dev--fre.lightning.force.com");
           }
       });
   })
</script>
</body>
</html>view raw reCaptchav3.html hosted with ❤ by GitHub
Some things to take note of:
Next we’ll first create our Apex class:
public with sharing class RecaptchaHandler {
   public RecaptchaHandler(){

   }


   @AuraEnabled
   public static Boolean isReCAPTCHAValid(String tokenFromClient) {
       //this is not safe, consider putting it in a custom metadata type of securing it in some other way
       String SECRET_KEY = 'YOURSITESECRET';
       String RECAPTCHA_SERVICE_URL = 'https://www.google.com/recaptcha/api/siteverify';
       Http http = new Http();

       HttpRequest request = new HttpRequest();

       request.setEndpoint(RECAPTCHA_SERVICE_URL + '?secret=' + SECRET_KEY + '&response=' + tokenFromClient);
       request.setMethod('POST');
       request.setHeader('Content-Length', '0');
       HttpResponse response = http.send(request);

       Map<String, Object> mapOfBody = (Map<String, Object>) JSON.deserializeUntyped(response.getBody());

       Boolean success = (Boolean) mapOfBody.get('success');
       Decimal score = (Decimal) mapOfBody.get('score');

       //You'll receive a score and success message. Create your own logic on how to handle this score.
       if(score > 0.5){
           //score passed the treshold, sending success back to component
           success = true;
       } else {
           success = false;
       }
view raw RecaptchaHandler hosted with ❤ by GitHub
Make sure to replace the value of the SECRET_KEY variable with your site secret from the reCAPTHA Admin Console (‘6LeZrQwgAAAAADzKx0_R0q237f1mE4V0VoclVUMa’ in our example). Also, be aware that storing the secret key like demonstrated above is not really a good practice, but it’ll do for the sake of this example.
The class itself is rather simple, and you’ll need to flesh this out in real life, but what we’re doing here is creating a POST request to the reCAPTCHA endpoint with the Token we’ll receive from the static resource. When successful, this call will return a score. This score is a value between 0 and 1, where 0 is absolutely dodgy and 1 is okey-dokey.
reCAPTCHA learns by seeing real traffic on your site. For this reason, scores in a staging environment or soon after implementing may differ from production. As reCAPTCHA v3 doesn’t ever interrupt the user flow, you can first run reCAPTCHA without taking action and then decide on thresholds by looking at your traffic in the admin console. I set the score threshold to 0.5 for the sake of this demonstration. If the score is bigger than 0.5 I simply return TRUE.
With the Apex class in place, let’s move on to our reusable reCAPTCHA component.
<!-- Re Captcha Lwc -->
<template>
   <div class="slds-m-around_none">
       <iframe src={navigateTo} name="captchaFrame" onload={captchaLoaded} width="100%" height="100px" style="border: none"></iframe>
   </div>
</template>
view raw reCAPTCHALWC.html hosted with ❤ by GitHub
import {LightningElement, track} from 'lwc';
import pageUrl from '@salesforce/resourceUrl/reCaptchav3';
import RecaptchaHandler from '@salesforce/apex/RecaptchaHandler.isReCAPTCHAValid';

export default class reCaptchaLWC extends LightningElement {

   formToken;
   validReCAPTCHA;

   @track navigateTo;

   constructor(){
       super();
       this.navigateTo = pageUrl;
   }

   async captchaLoaded(evt){
       let self = this;
       var e = evt;
       console.log(e.target.getAttribute('src') + ' loaded');
       if(e.target.getAttribute('src') == pageUrl){

           await window.addEventListener("message", function(e) {
               if (e.data.action == "getCAPCHA" && e.data.callCAPTCHAResponse == "NOK"){
                   console.log("Token not obtained!")
               } else if (e.data.action == "getCAPCHA" ) {
                   console.log(e.data);
                   this.formToken = e.data.callCAPTCHAResponse;
                   RecaptchaHandler({tokenFromClient: e.data.callCAPTCHAResponse}).then(data => {
                       this.validReCAPTCHA = data;
                   console.log('received result from RecaptchaHandler. Value = '+this.validReCAPTCHA);
                       try {self.createEvent(data)}
                       catch (error) {
                           console.log(error);
                       }
                   });
               }
           }, false);
       }
   }

   createEvent(data){
       console.log('creating message for parent');
       const captchaResponse = new CustomEvent('captchareceived', {
           detail: {
               data: data
           }
       });
       this.dispatchEvent(captchaResponse);
   }
}
view raw reCAPTCHALWC.js hosted with ❤ by GitHub
<?xml version="1.0" encoding="UTF-8"?>
<LightningComponentBundle xmlns="http://soap.sforce.com/2006/04/metadata">
   <apiVersion>53.0</apiVersion>
   <description>Re Captcha Lwc</description>
   <isExposed>true</isExposed>
   <masterLabel>Re Captcha Lwc</masterLabel>
   <targets>
       <target>lightning__AppPage</target>
       <target>lightning__RecordPage</target>
       <target>lightning__HomePage</target>
       <target>lightningCommunity__Default</target>
       <target>lightningCommunity__Page</target>
       <target>lightning__Tab</target>
   </targets>
</LightningComponentBundle>
view raw reCAPTCHALWC.js-meta.xml hosted with ❤ by GitHub
This LWC will render the static resource in an iframe, and will call the captchaLoaded method in reCaptchaLWC.js when the component loads. In the reCaptchaLWC.js we create an event listener that will fire when it receives a message with the action parameter ‘getCAPCHA’. In that case we will call our apex class.
Our apex class will receive the token, do the callout and return TRUE or FALSE. Upon receiving our result from the Apex class, we’ll also fire a Custom Event so that whatever component we’re embedding this reCAPTCHA component in will be able to receive the data.
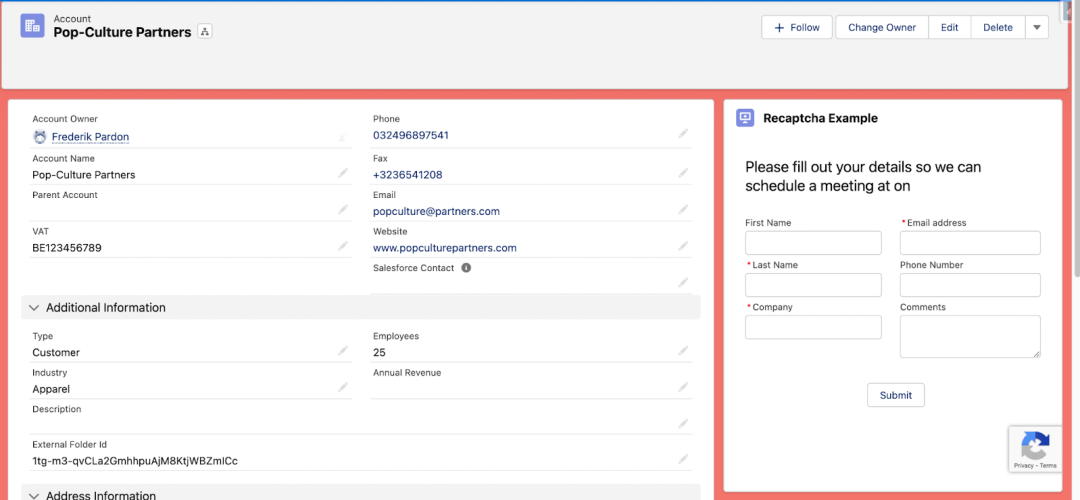
Now, for the final part, we’ll create a simple LWC with some form fields, a button and embed our reusable component in it.
<!-- Re Captcha Example -->
<template>
   <lightning-card title="Recaptcha Example" icon-name="standard:device">
       <div class="slds-p-around_medium lgc-bg">
           <div class="slds-text-heading_medium slds-p-around_small">Please fill out your details so we can schedule a meeting at {selectedTime} on {selectedDate}</div>
           <lightning-layout>
               <lightning-layout-item flexibility="auto" padding="around-small">
                   <lightning-input type="text" label="First Name" name="firstName"></lightning-input>
                   <lightning-input type="text" label="Last Name" name="lastName" required="true"></lightning-input>
                   <lightning-input type="text" label="Company" name="company" required="true"></lightning-input>
               </lightning-layout-item>
               <lightning-layout-item flexibility="auto" padding="around-small">
                   <lightning-input type="email" label="Email address" name="email" required="true"></lightning-input>
                   <lightning-input type="tel" label="Phone Number" name="phone"></lightning-input>
                   <lightning-textarea label="Comments" name="comments"></lightning-textarea>
               </lightning-layout-item>
           </lightning-layout>
       </div>
       <div class="slds-align_absolute-center">
           <lightning-button if:false={allowSubmit} label="Submit" title="Submit" onclick={handleSubmit} class="slds-m-left_x-small" disabled="true"></lightning-button>
           <lightning-button if:true={allowSubmit} label="Submit" title="Submit" onclick={handleSubmit} class="slds-m-left_x-small"></lightning-button>
       </div>
       <div>
           <c-re-captcha-l-w-c oncaptchareceived={handleCaptchaReceived}></c-re-captcha-l-w-c>
       </div>
   </lightning-card>
</template>
view raw reCaptchaExample.html hosted with ❤ by GitHub
import {LightningElement} from 'lwc';

export default class ReCaptchaExample extends LightningElement {

   allowSubmit;

   handleCaptchaReceived(event){
       console.log('received message from child');
       console.log('childMessage', JSON.stringify(event.detail));
       if(event.detail.data === true){
           this.allowSubmit = true;
       }
   }
}
view raw reCaptchaExample.js hosted with ❤ by GitHub
<?xml version="1.0" encoding="UTF-8"?>
<LightningComponentBundle xmlns="https://web.archive.org/web/20220524061606/http://soap.sforce.com/2006/04/metadata">
   <apiVersion>53.0</apiVersion>
   <description>Re Captcha Example</description>
   <isExposed>true</isExposed>
   <masterLabel>Re Captcha Example</masterLabel>
   <targets>
       <target>lightning__AppPage</target>
       <target>lightning__RecordPage</target>
       <target>lightning__HomePage</target>
   </targets>
</LightningComponentBundle>
view raw gistfile1.txt hosted with ❤ by GitHub
Nothing special here. The final div element in the reCaptchaExample.html is where we embed our reusable component. We’re also telling the reCaptchaExample component to execute the handleCaptchaReceived method in our reCaptchaExample.js when it receives an event of the type we defined in our reCaptchaLWC.js.
There are two button elements in reCaptchaLWC.html, these are tied to the variable allowSubmit. If allowSubmit equals TRUE, we’ll enable the button, and if it is FALSE we’ll disable the button.
Save your work, deploy it and place the reCaptchaExample component on a record page.
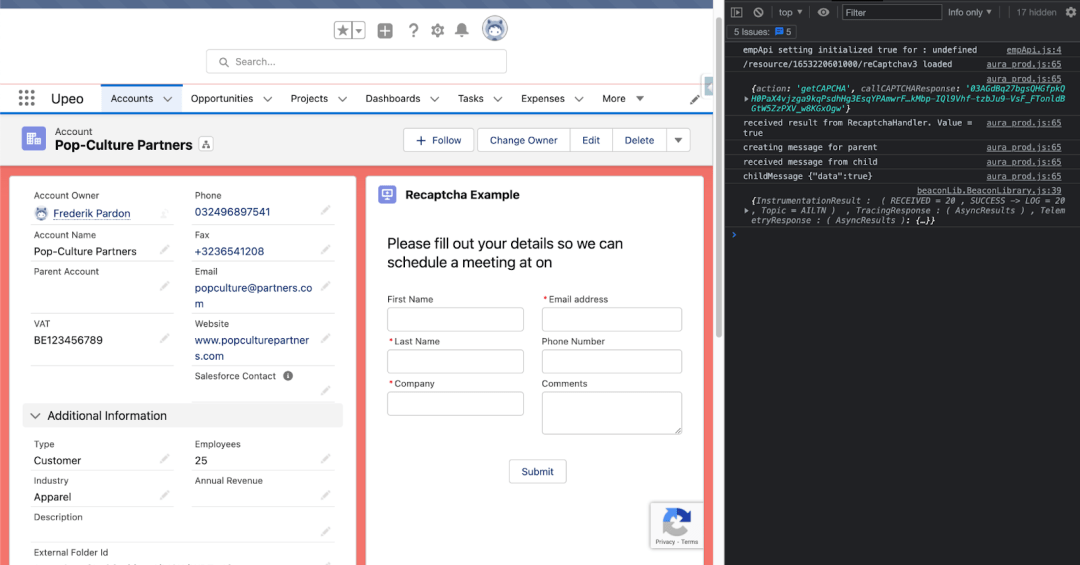
You’ll see the reCAPTCHA banner on the bottom of the component. You can also test the behavior of the button by setting the treshold score to a higher or lower value in the RecaptchaHandler class. Remember that reCAPTCHA will return a score between 0 and 1. Open the console if you want to see some additional logging:
That’s it! I hope this post ever comes to be of use to someone. If you have any questions or remarks, please reach out to me on Twitter, you can find me there as @pardonder or on our company’s handler @Upeoconsulting. You can also find me and Upeo on LinkedIn here and here. You can of course also contact us by leaving your details, and we’ll get in touch with you!